Tiling Tools: The Unsung Heroes Behind Every Flawless Surface
Knowing which tiling tools to use, when to use them, and how to maintain them isn't just helpful—it's essential. Click to learn more about this informative post
TOOLS
7/7/20256 min read
Tiling tools may not steal the spotlight in a glossy home renovation spread, but make no mistake—they are the backbone of every immaculate tile job. Without them, the elegant geometry of a bathroom floor or the shimmering harmony of a kitchen backsplash would never come to life. And yet, when people imagine a tile project, they often picture the tiles themselves: ceramic, porcelain, natural stone, or glass. Rarely do they think about the array of tools required to shape, set, level, grout, and finish those tiles to perfection.
But here's the truth: the difference between a DIY disaster and a professional-quality tiling job often lies in the tiling tools used, and in the hand that wields them with knowledge and precision.
A World Beneath the Surface
Imagine watching a seasoned tile setter work. It's almost like choreography—tools moving in a sequence that’s been honed through years of practice. The notched trowel lays out adhesive in rhythmic waves. The tile cutter scores and snaps with satisfying precision. Spacers nestle into place, ensuring perfect alignment. A level glides over the surface, checking every tile like a conductor fine-tuning the orchestra.
What you’re seeing in that moment is more than manual labor. You’re witnessing the execution of planning, preparation, and an intimate understanding of how materials behave. The tiling tools involved aren't just implements; they’re extensions of the installer’s intention and attention.
Every successful tiling project, whether it’s a compact powder room or a sprawling outdoor patio, begins with this relationship between craft and tool. Knowing which tiling tools to use, when to use them, and how to maintain them isn't just helpful—it's essential.
The Foundation of Good Preparation
The story of tiling begins long before the first tile is laid. Surface preparation is crucial, and the tiling tools used during this phase set the stage for everything that follows. Levels and straightedges ensure the substrate is flat and plumb. Chalk lines or laser levels mark out reference lines, ensuring symmetrical layouts. Mixing paddles attached to power drills blend thinset or mortar to the ideal consistency, free of clumps and ready to bond tiles firmly.
If there's even a slight dip or slope in the surface, it can telegraph through the tile, creating an uneven finish that no amount of post-installation wizardry can fix. That’s why surface prep tools, though often invisible in the final product, are some of the most important tiling tools in the whole process.
Cutting with Care and Precision
One of the most delicate moments in any tiling project is the cut. Cutting tiles isn't just about shaping them to fit—it’s about doing so cleanly, accurately, and without chipping or cracking. Manual tile cutters, with their scoring wheels and breaking mechanisms, are ideal for straight cuts in ceramic and porcelain tiles. They offer quick results and are surprisingly precise when handled correctly.
For more intricate shapes—around pipes, corners, or electrical boxes—wet saws and angle grinders come into play. These tiling tools introduce water to cool the blade and reduce dust, protecting both the material and the installer. Tile nippers are perfect for tiny notches or curves. But mastery requires more than simply owning the tools. It's about understanding the type of tile you're working with and adapting your cutting method to the material's hardness, brittleness, and finish.
A misjudged cut can waste a tile or throw off an entire layout. A perfect cut, on the other hand, disappears into the design, seamlessly joining its neighbors in a mosaic of skillful precision.
Setting the Stage: Laying the Tiles
Once cutting is complete, it’s time for placement—and this is where tiling tools for setting tiles come to the forefront. The notched trowel is a fundamental player here. By applying mortar in a combed pattern, it ensures even coverage and allows air to escape as the tile is pressed into place.
The notch size of the trowel depends on the size and type of tile: large-format tiles need deeper notches to support their weight and surface area. A flat margin trowel helps in tight spaces and around edges, allowing precision without waste.
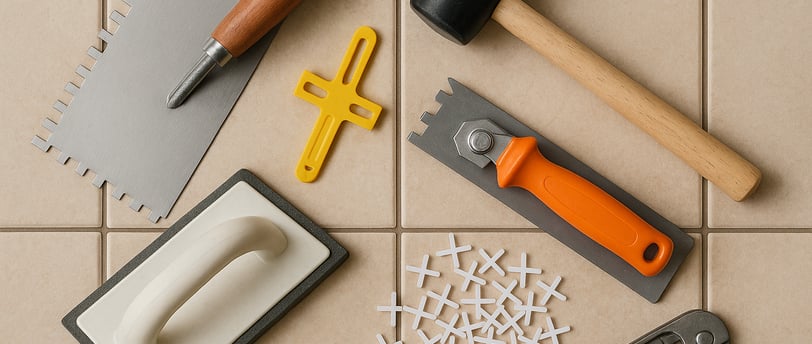
Then come tile spacers. These small, often-overlooked tiling tools are vital for consistency. They create the uniform grout joints that define a tile pattern's rhythm. Skipping them or using them inconsistently can result in crooked lines or an unprofessional look. Once the tiles are in place, a level ensures everything is flush and aligned. Slight adjustments are made with tile leveling systems that eliminate lippage—the height differences between adjacent tiles.
Tiling isn't static. Mortar dries, tiles shift, and environments fluctuate. The best installers use tiling tools to anticipate and correct these movements, locking in a layout that remains beautiful and functional for years.
The Art and Science of Grouting
With tiles set and cured, it’s time to grout. This phase can transform the appearance of a project. Grout color, texture, and application determine whether a tiled surface looks clean and crisp or busy and disjointed. Grouting tiling tools must be chosen with care.
A rubber grout float presses grout into joints without scratching the tile face. The float’s flexibility allows it to conform to different tile shapes and joint widths. After initial curing, a sponge is used to clean excess grout—but timing is everything. Wipe too soon, and you pull grout out of the joints. Wait too long, and you get a hazy residue that’s hard to remove.
For large areas or specialty tiles, additional tools like grout bags, finishing tools, or even electric grout applicators can make a difference. And when working with epoxy grout—a more durable but finicky material—you need specific cleaning tools to avoid hardened residue.
Every motion during this stage is a balance between pressure and patience. The right tools guide your hands and preserve your vision.
Cleanup, Maintenance, and Mastery
When the final sponge pass has been made and the haze is gone, tiling tools have one more job: maintenance. Good tools are an investment. Cleaned properly and stored carefully, they can last for years. Trowels must be cleared of hardened mortar. Cutters and saws need blade inspections and lubrications. Sponges should be rinsed and dried thoroughly.
Tool maintenance isn’t just about longevity—it’s about readiness. A clean, sharp tool is more precise, safer, and more pleasant to use. For professionals, it's a matter of pride. For homeowners and DIYers, it's a mark of respect for the process and the craft.
As your collection of tiling tools grows, so does your understanding. With each project, you start to notice the small differences: the way a certain trowel feels in your hand, the way a specific tile responds to your cutter. You begin to develop intuition, supported by a tactile familiarity that no video tutorial can replicate.
Tiling Tools as a Creative Companion
What often goes unspoken in discussions of tiling tools is their role as creative enablers. Yes, they are functional. But they also unlock ideas. With the right set of tools, suddenly a patterned tile border around a fireplace feels doable. A hexagon-tiled shower niche becomes a weekend project instead of a design fantasy.
These tools reduce friction between inspiration and execution. They give shape to creativity. They turn the imagined into the tangible. Like brushes to a painter or chisels to a sculptor, tiling tools are the physical bridge between vision and reality.
This is especially true when experimenting with mixed materials, mosaic layouts, or challenging formats. The more you explore the boundaries of what tile can do, the more you appreciate how specific tiling tools give you the control to take risks and achieve finesse.
Technology and the Modern Tile Toolbox
Tiling tools have also evolved with technology. Today, laser levels replace chalk lines for absolute accuracy. Battery-powered mixers create consistent thinset batches without fatigue. Digital tile cutters offer computer-guided precision for intricate designs.
Smart systems for tile leveling make it easier for beginners to achieve results that rival seasoned pros. These innovations make tiling more accessible and reduce the intimidation factor of complex designs.
Yet, even with these advances, the fundamentals remain. The humble trowel, the sponge, the cutter—these are timeless tools whose effectiveness is proven across centuries and continents.
Beyond the Surface: A Deeper Respect
When you walk into a beautifully tiled space, you're seeing more than just design. You're seeing the result of decisions, skills, and tools brought into harmony. Behind every aligned corner and crisp joint is a story of preparation, attention, and discipline.
Tiling tools may not be glamorous, but they are noble. They represent our desire to build spaces that are both beautiful and functional. They help us transform materials into mosaics, stories, and shelter.
So whether you're embarking on your first DIY backsplash or refining your skills as a professional tiler, take a moment to acknowledge the quiet importance of your tools. Respect them. Learn from them. Let them teach you the rhythms and rules of the craft. In doing so, you honor not only the finished work but the art of creation itself.
Because when it comes to great tiling, the tools don't just support the work—they shape it.
About
Elijah Tiles is a trusted name in quality tiling services, led by a passionate and highly skilled professional with years of hands-on experience in residential, commercial, and custom tiling projects. We specialize in transforming ordinary spaces into beautiful, functional environments using precise craftsmanship and durable finishes. Whether it's bathroom remodeling, kitchen splashbacks, floor and wall tiling, or decorative mosaic work, Elijah Tiles delivers excellence on every job—big or small.
Services
Contact
info@elijahtiles.com
+35677685882
Elijah Tiles © 2025, All rights reserved.